Getting Started
Manage Targets
Manage Scans
Manage Organizations
Organization Settings
Plans
On Prem
Scan Profile
This is where Scan Profiles come in. Rather than configuring these options from scratch every time you run a scan, a Scan Profile lets you define your preferred setup once and save it for repeated use. Whether you are running scheduled scans, testing the same target regularly, or maintaining consistent coverage across your team, profiles ensure that the right configuration is always ready to go.
What is a Scan Profile?
A Scan Profile stores the core choices that define how a scan will run, including whether the scan is authenticated or unauthenticated, which login sequence should be used if authentication is required, which additional coverage options should be included such as Tech Stack Based Vulnerability coverage and Prebuilt Attack Templates, and your production-safe scan preference where applicable. Together, these settings define how the scan should behave and what additional checks should run alongside the default ZeroThreat scanner coverage.
Feature Availability
Many features in Scan Profile like Production Safe Testing, Prebuilt Attack Templates, Tech Stack Based Vulnerability may only be available in certain plans. Refer to the ZeroThreat Plans page for full feature availability details.
How to create a Scan Profile
Step 1: Select your target
From the ZeroThreat dashboard, select the target you want to scan.

Step 2: Click Create a Scan Profile
Click on Create a Scan Profile.
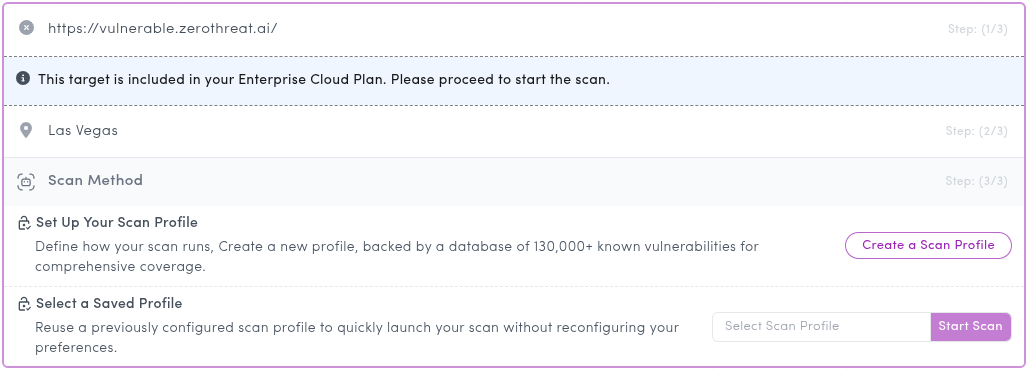
This opens the Configure Scan Preferences popup.
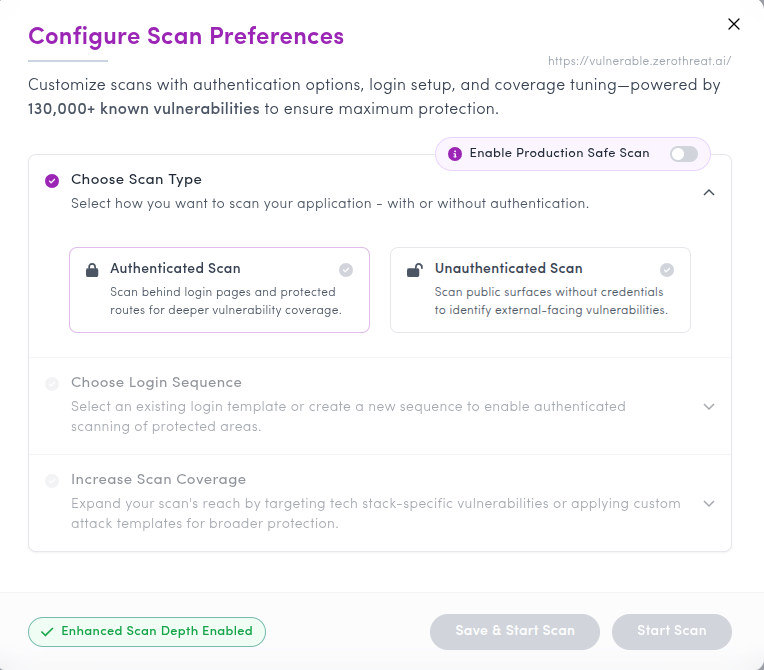
Step 3: Choose the scan type
Under Choose Scan Type, select how you want to scan the target as either Authenticated Scan or Unauthenticated Scan.
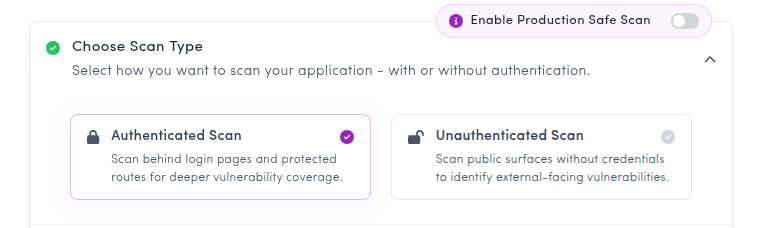
If you choose Authenticated Scan, you will also need to select a corresponding login sequence.
Under Choose Login Sequence, select an existing login sequence or create a new one.
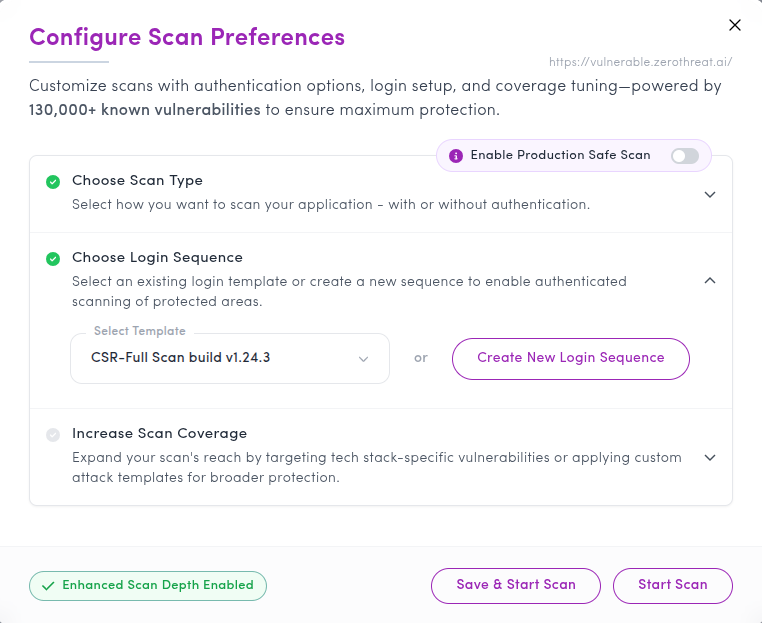
If you need more detail on creating or recording login sequences, refer to the Login Sequence documentation.
Production Safe Scan
Above the scan type option, you will also see the Enable Production Safe Scan option.
Enabling this turns on production-safe testing. ZeroThreat avoids destructive actions, spammy dummy data creation, and unsafe payloads during the scan.
This can reduce testing coverage, so enable it only when necessary. Testing in both production and non-production environments is recommended for best coverage.
When Enable Production Safe Scan is turned on, Tech Stack Based Vulnerabilities and Prebuilt Attack Templates are automatically disabled.
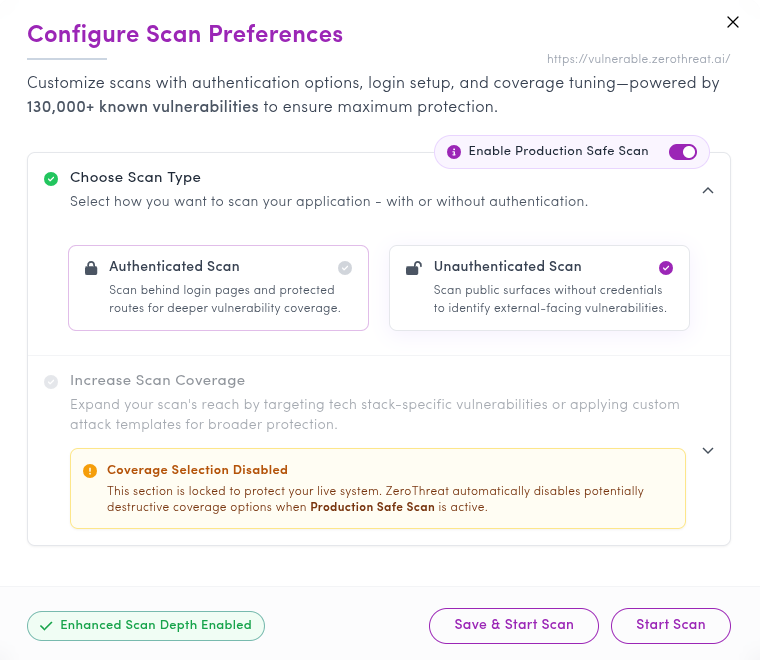
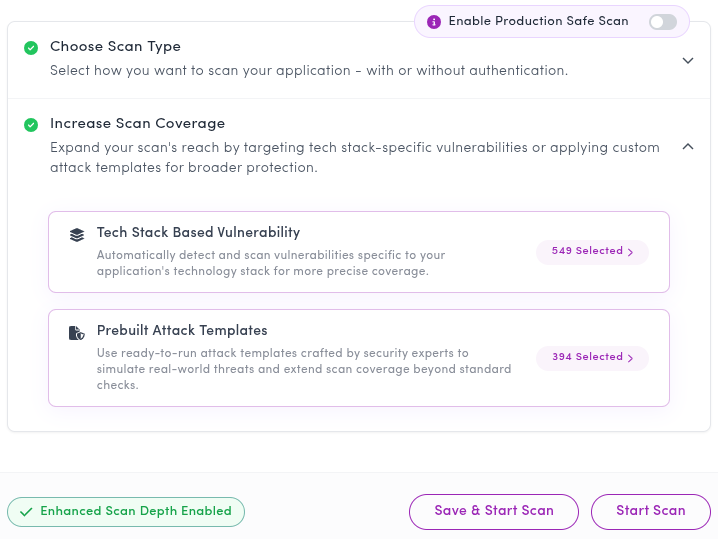
Increase Scan Coverage
The Increase Scan Coverage section lets you extend testing beyond the default scanner coverage.
This section includes two options: Tech Stack Based Vulnerability and Prebuilt Attack Templates. These options let you add additional checks based on your application stack or broader vulnerability categories.
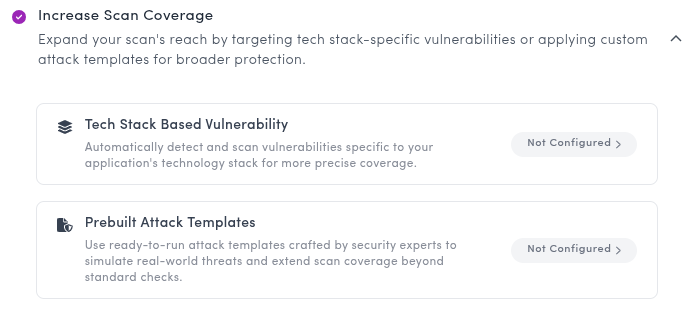
Tech Stack Based Vulnerability
The Tech Stack Based Vulnerability section contains a large collection of CVE-based test cases.
Since testing every possible CVE is not practical, ZeroThreat helps narrow down the selection so that only more relevant checks are included. This makes the feature more useful for real applications and reduces unnecessary noise.
When you open this section, you can refine the coverage based on your selected technology stack, CVE timeline, and severity.
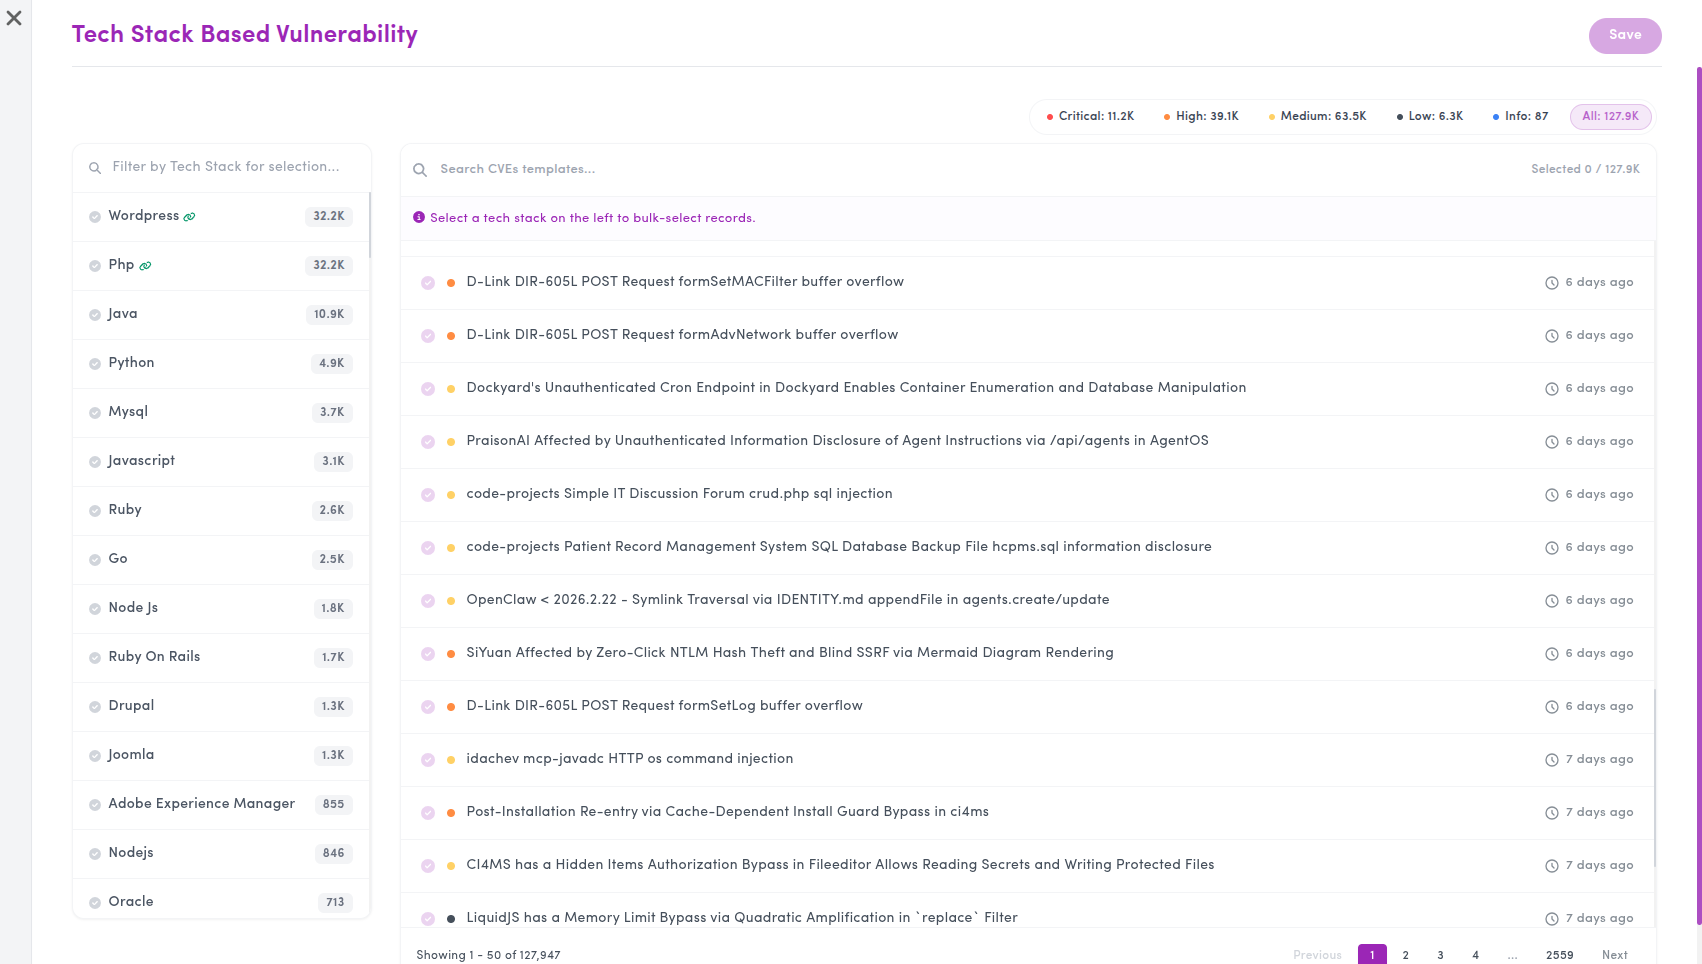
Filter by technology stack
On the left side, select the technologies that match your application.
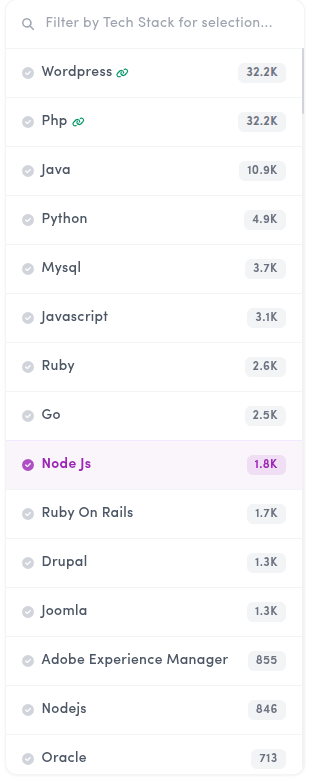
This helps ZeroThreat focus on CVE tests that are relevant to your target application. For example, if your application is built on WordPress, PHP, Java, or Node.js, selecting the right technology narrows the list to tests associated with that stack.
This is the most important step because it keeps the selected CVE coverage practical and relevant.
Filter by timeline
After selecting the technology stack, choose the timeline of the CVEs you want to include.
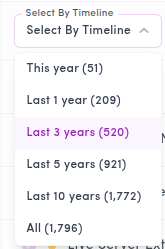
This helps you focus on newer and more relevant CVEs instead of selecting the full historical set. Depending on your needs, you can keep the selection limited to recent issues or widen it for broader testing.
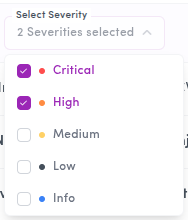
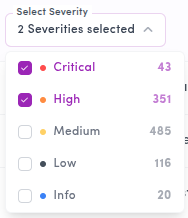
Filter by severity
You can then refine the results further by severity.
This allows you to focus first on the kinds of issues you care about most, such as Critical and High severity CVEs, before expanding to Medium, Low, or Informational checks if needed.
Include the selected templates
As you make your selections, a prompt remains visible in the corner showing how many templates are currently selected.

You will see a message like: Do you want to include these [x] scan templates?
When you are satisfied with the selection, click Yes to include them.
You can continue refining and adding more selections until you have the set of CVE tests you want. Once done, click Save to include them in your Scan Profile.
Tech Stack Based Vulnerability is designed to make large CVE collections easier to use by narrowing them down based on your application’s actual technologies and your chosen filters.
Prebuilt Attack Templates
The Prebuilt Attack Templates section contains general vulnerability test cases that are not tied to specific CVEs.
These are broader, CVE-less security checks designed to extend scan coverage beyond tech stack specific CVE testing. Instead of organizing checks by technology, this section groups templates by vulnerability category, making it easier to include broader classes of security testing based on what you want to assess.
When you open this section, you can browse template groups such as exposure-related checks, security misconfigurations, platform weaknesses, authentication risks, and other general vulnerability categories. This makes it easier to build broader coverage without needing to map selections to a specific technology stack.
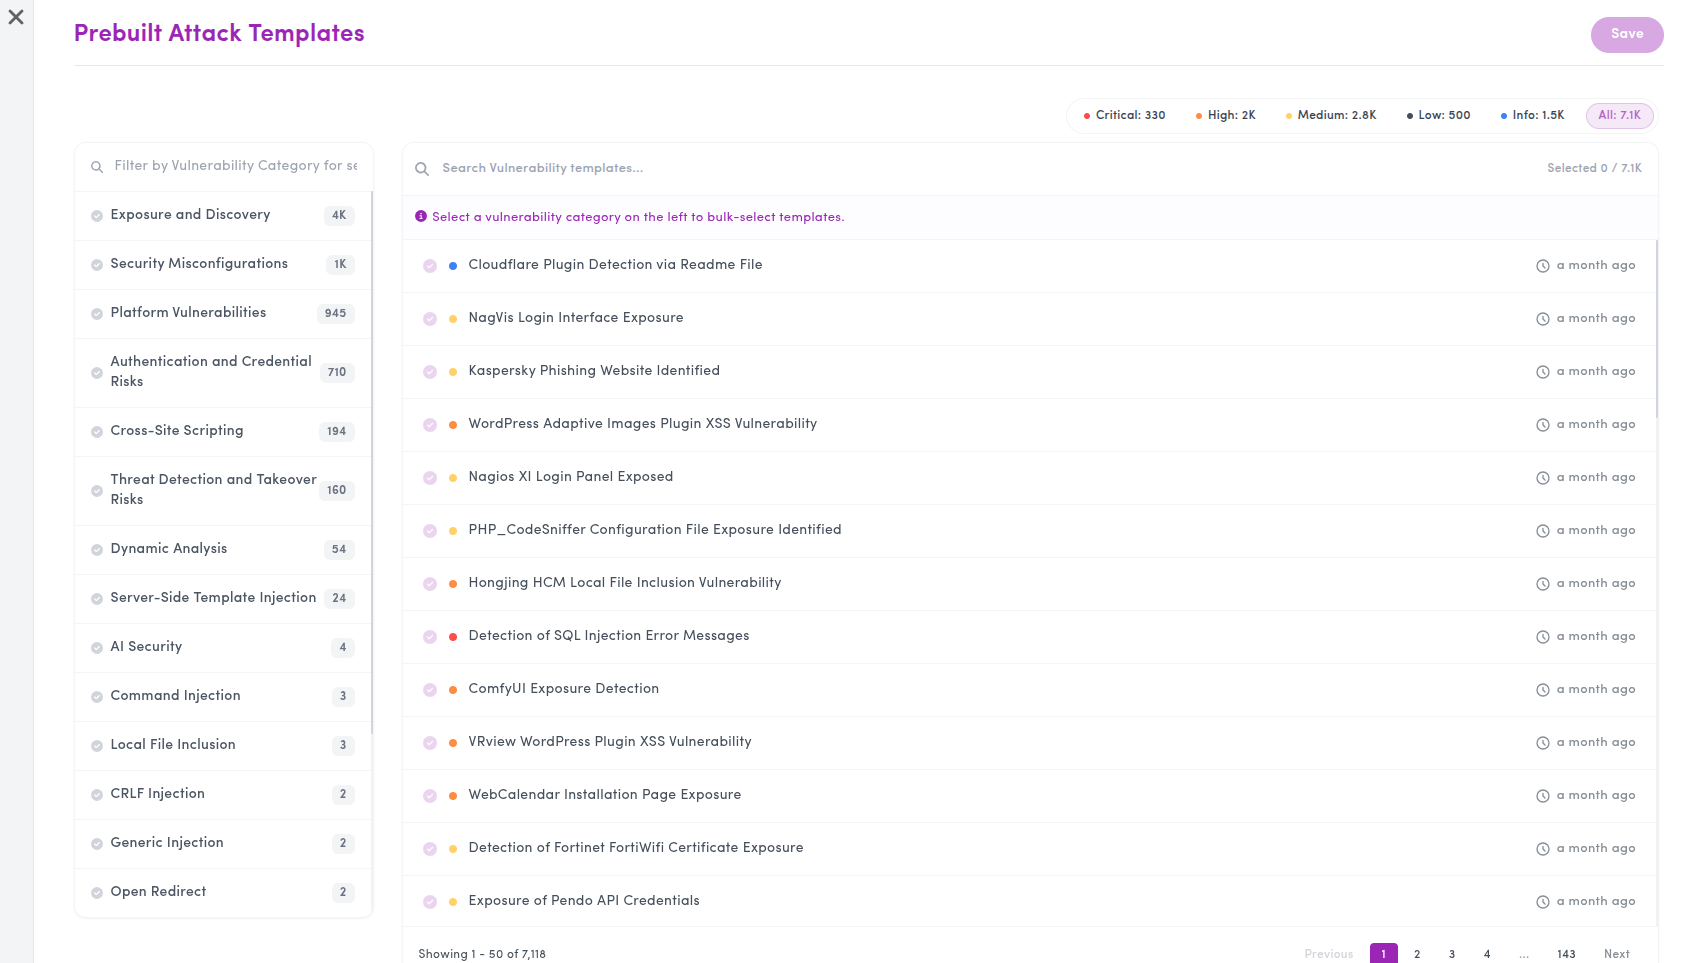
Filter by vulnerability category
On the left side, select the category you want to work with.
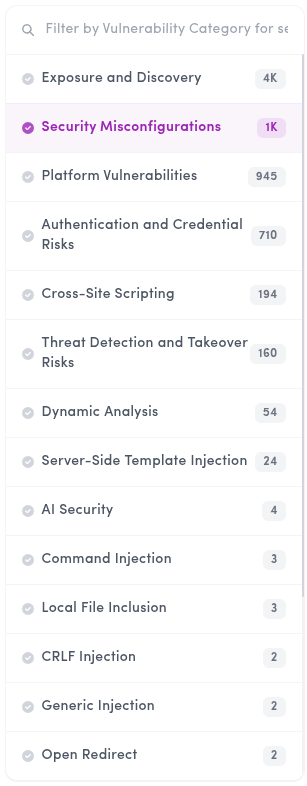
This helps focus the available templates based on the type of weakness you want to test for, rather than the underlying technology.
Filter by severity
Unlike Tech Stack Based Vulnerability, Prebuilt Attack Templates do not use timeline filtering.
Since these are general templates rather than CVE-based checks, the available filter here is Severity. This helps you narrow down which checks to include based on the level of impact you want to focus on.
Include the selected templates
As with Tech Stack Based Vulnerability, a prompt remains visible showing how many templates are currently selected.

Once you are satisfied with your selection, click Yes to include them.
You can continue selecting templates from different categories until the coverage looks right. Then click Save to add them to the Scan Profile.
Saving the Scan Profile
After configuring the scan type, login sequence, and any additional coverage, you can proceed with the final action for the scan setup.
At this stage, you will see two options: Save & Start Scan and Start Scan.
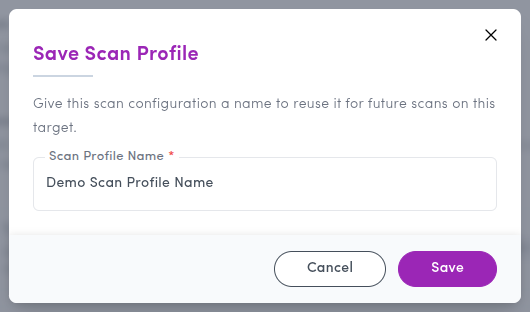
If you click Save & Start Scan, ZeroThreat opens a new popup asking you to provide a name for the Scan Profile. Enter a meaningful name and save it, the profile is stored for future reuse and the scan starts immediately using that saved profile.
If you click Start Scan, ZeroThreat starts the scan immediately with the selected configuration, but does not save it as a reusable Scan Profile. This is useful when you want to run a one-time scan with a particular setup without saving it for future use.
Editing an existing Scan Profile
Scan Profiles can be updated later if your application has changes or your testing needs evolve.
One way to edit a profile is from the Targets section. Open the target, go to its configuration, and open Scan Profiles. There, click the edit icon next to the profile you want to update. You can then make the required changes and save them.
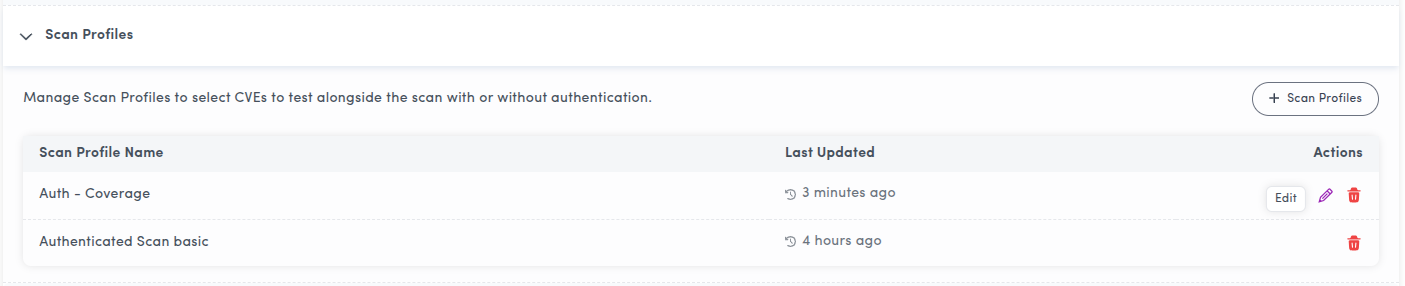
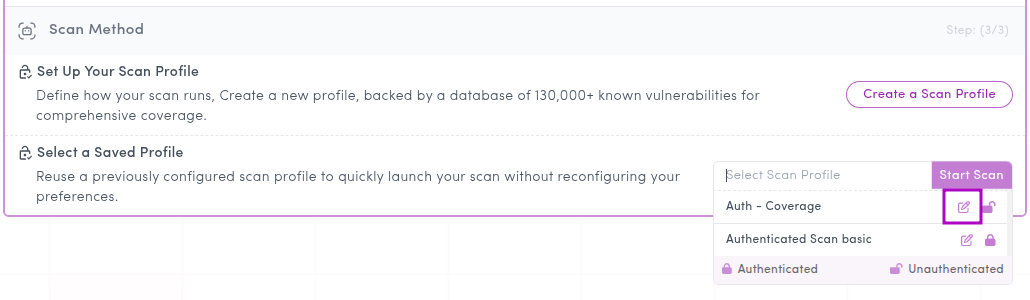
Another way to edit a profile is while starting a scan from the dashboard. When selecting a Scan Profile for the scan, you will see an edit ( ) button next to it. Click that button, make your changes, and save the updated profile.
This makes Scan Profiles easier to maintain over time without needing to recreate them from scratch.
Tips for using Scan Profiles effectively
- For Tech Stack Based Vulnerability, select only the technologies that actually apply to your application. This helps avoid irrelevant CVE checks and keeps the results more meaningful.
- A practical starting point is to begin with more recent CVEs and higher severities, then expand the selection later if broader coverage is needed.
- Use Prebuilt Attack Templates when you want broader security testing that is not tied to a specific tech stack or CVE set.
- You also do not need to get everything perfect in the first version of a profile. Save a practical starting profile, reuse it, and refine it over time as your testing needs change